在Linux环境开发Swift
2018年10月, 苹果宣布Swift将通过LSP支持非Apple平台 ,通过开源 SourceKit-LSP 可以在Linux平台使用Swift语言进行开发。你可以通过Language Server Protocol (LSP) 来结合 VS Code 在Linux平台开发Swift语言的服务器软件。这种以Swift语言为基础的全栈技术,可以帮助我们锻炼Swift开发能力,更好辅助iOS/macOS等移动设备软件开发。
安装Swift
在 Swift website Download 提供了软件包以及针对不同Linux版本 swift recommended toolchain 。虽然官方网站只提供了Ubuntu和CentOS以及Amazon Linux2 和Windows 10版本,但是实际Fedora的软件仓库也直接提供了Swift:
sudo dnf -y install swift-lang
如果你在Ubuntu环境下安装,则下载对应的toolchain,然后使用以下命令安装(注意 FILE 替换成下载的文件名)
sudo apt-get install curl clang libicu-dev git libatomic1 libicu60 libxml2 libcurl4 zlib1g-dev libbsd0 tzdata libssl-dev libsqlite3-dev libblocksruntime-dev libncurses5-dev libdispatch-dev -y
mkdir ~/swift
tar -xvzf FILE -C ~/swift
然后创建环境 ~/.bashrc 配置如下:
export PATH="~/swift/FILE/usr/bin:$PATH"
一旦安装完成,使用以下命令验证:
swift --version
输出类似( Fedora ):
Swift version 5.5.2 (swift-5.5.2-RELEASE)
Target: x86_64-unknown-linux-gnu
运行问题排查
尝试执行 A Complete Guide to Swift Development on Linux 提供的demo,发现有如下报错:
...
/home/huatai/Todos/Starter/.build/checkouts/swift-nio/Sources/NIO/ContiguousCollection.swift:21:1: error: type 'StaticString' does not conform to protocol 'Collection'
extension StaticString: Collection {
^
/home/huatai/Todos/Starter/.build/checkouts/swift-nio/Sources/NIO/ContiguousCollection.swift:21:1: error: unavailable subscript 'subscript(_:)' was used to satisfy a requirement of protocol 'Collection'
extension StaticString: Collection {
^
Swift.Collection:3:12: note: 'subscript(_:)' declared here
    public subscript(bounds: Range<Self.Index>) -> Self.SubSequence { get }
           ^
Swift.Collection:12:5: note: requirement 'subscript(_:)' declared here
    subscript(bounds: Range<Self.Index>) -> Self.SubSequence { get }
    ^
Language Server Protocol
安装
VSCode结合Language Server Protocol 可以实现不同语言的智能开发,包括Swift语言,苹果公司提供了 SourceKit-LSP 来实现
在 Ubuntu Linux 上可以通过以下命令安装 SourceKit-LSP
curl -sL https://deb.nodesource.com/setup_12.x | sudo -E bash - # You can skip this command if you already have node installed.
sudo apt-get install -y nodejs # Same goes for this command.
git clone https://github.com/apple/sourcekit-lsp.git
cd sourcekit-lsp/

swift package update  #1
swift build -Xcxx -I/home/YOURUSER/swift/FILE/usr/lib/swift #2
sudo mv .build/x86_64-unknown-linux-gnu/debug/sourcekit-lsp /usr/local/bin #3
更新 Swift 最新版本
源代码编译SourceKit-LSP,这里的
-I参数添加了C++编译器将要查看.h文件的扩展目录将编译后的二进制执行程序移动到
/usr/local/bin目录,这样 VSCode 就能使用它
Apple的 Swift官方提供下载Toolchain 包含了支持CentOS 7和CentOS 8,所以只要安装了官方的ToolChain之后就自动在
bin目录下有sourcekit-lspFedora 35 虽然软件仓库提供了
swift-lang,但是没有提供SourceKit-LSP,所以也需要从源代码编译:# 需要安装nodejs sudo dnf install nodejs -y # 下载SourceKit-LSP git clone https://github.com/apple/sourcekit-lsp.git cd sourcekit-lsp/Editors/vscode # 编译扩展,在out目录下创建 .vsix 包 npm install npm run dev-package # 安装扩展 code --install-extension sourcekit-lsp-development.vsix
配置
在 VSCode 的
Preferences > Extensions > SourceKit-LSP可以找到已经安装好的sourcekit-ls
Hello World
使用包管理器
创建包:
mkdir Hello
cd Hello

swift package init
init会创建以下目录结构:. ├── Package.swift ├── README.md ├── Sources │ └── Hello │ └── Hello.swift └── Tests └── HelloTests └── HelloTests.swift可以编译包:
swift build
提示:
[4/4] Build complete!
测试包:
swift test
注意, swift package init 没有参数不创建 main.swift ,则编译后不是可执行代码
编译可执行程序
重新创建一个空目录:
mkdir Hello
cd Hello
初始化,这次使用可执行类型:
swift package init --type executable
编译并运行:
swift run Hello
此时可以看到:
[6/6] Build complete!
Hello, world!
也可以分开步骤:
swift build
编译输出的目录在隐含目录 .build 目录下,所以执行方法:
.build/x86_64-unknown-linux-gnu/debug/Hello
输出也可以看到:
Hello, world!
使用VSCode开发验证LSP
在
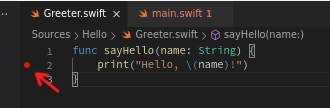
Sources/Hello目录下添加一个Greeter.swift文件,并在VSCode中进行代码输入:func sayHello(name: String) { print("Hello, \(name)!") }
此时使用VSCode,可以看到IDE自动提示代码,表明安装的 SourceKit-LSP 能够正常工作
修改
main.swiftif CommandLine.arguments.count != 2 { print("Usage: hello NAME") } else { let name = CommandLine.arguments[1] sayHello(name: name) }
然后运行:
swift run Hello `whoami`
就会看到输出类似:
Hello, huatai!
Debug Swift
lldb debugging
Swift使用 lldb 来debug程序,这也是Xcode使用的默认debugger。 lldb 可以用于debug C, Objective-C, C++ 和 Swift。
安装:
sudo dnf install lldb
重新进行编译:
lldb .build/debug/Hello `whoami`
此时进入 LLDB 会话,注意程序尚未启动,需要设置一个断点:
(lldb) target create ".build/debug/Hello"
Current executable set to '/home/huatai/github.com/etudes/swift/Hello/.build/debug/Hello' (x86_64).
(lldb) settings set -- target.run-args  "huatai"
(lldb)
假设在
Greeter.swift中设置断点,则在LLDB会话中执行:breakpoint set -f Greeter.swift -l 2
提示信息:
Breakpoint 1: where = Hello`$s5Hello03sayA04nameySS_tF + 58, address = 0x000000000000111a
然后按下
r运行程序,立即执行到Greeter.swift的第2行并暂停:Process 61489 launched: '/home/huatai/github.com/etudes/swift/Hello/.build/debug/Hello' (x86_64) This version of LLDB has no plugin for the language "swift". Inspection of frame variables will be limited. Process 61489 stopped * thread #1, name = 'Hello', stop reason = breakpoint 1.1 frame #0: 0x000055555555511a Hello`$s5Hello03sayA04nameySS_tF at Greeter.swift:2:11 1 func sayHello(name: String) { -> 2 print("Hello, \(name)!") 3 } (lldb)
按下
c完成程序执行
使用VSCode进行debugging
在 VSCode 中安装
CodeLLDB就能够在VSCode中使用lldb进行调试在VSCode中按下
Control+Shift+X搜索CodeLLDB并安装
要配置VSCode使用LLDB进行Swift debug,需要在项目中创建一个
.vscode目录,并在这个目录下创建2个文件
 1{
 2  "version": "0.2.0",
 3  "configurations": [
 4    {
 5      "type": "lldb", // 1
 6      "request": "launch",
 7      "name": "Debug",
 8      "program": "${workspaceFolder}/.build/debug/Hello", // 2
 9      "args": ["${whoami}"], //3
10      "cwd": "${workspaceFolder}",
11      "preLaunchTask": "swift-build" // 4
12    }
13  ]
14}
lldb表示VSCode将使用 CodeLLDB使用的程序,这里是
Hello执行程序这里需要传递一个参数,对于命令行参数,传递
"${cwd}",也就是"${whoami}"在运行程序前加载的任务,也就是build程序
 1{
 2  "version": "2.0.0",
 3  "tasks": [
 4    {
 5      "label": "swift-build", // 1
 6      "type": "shell", // 2
 7      "command": "swift build" // 3
 8    }
 9  ]
10}
label是launch.json标记type是 shell,表明运行的plain shell命令command是确保不会错失修改
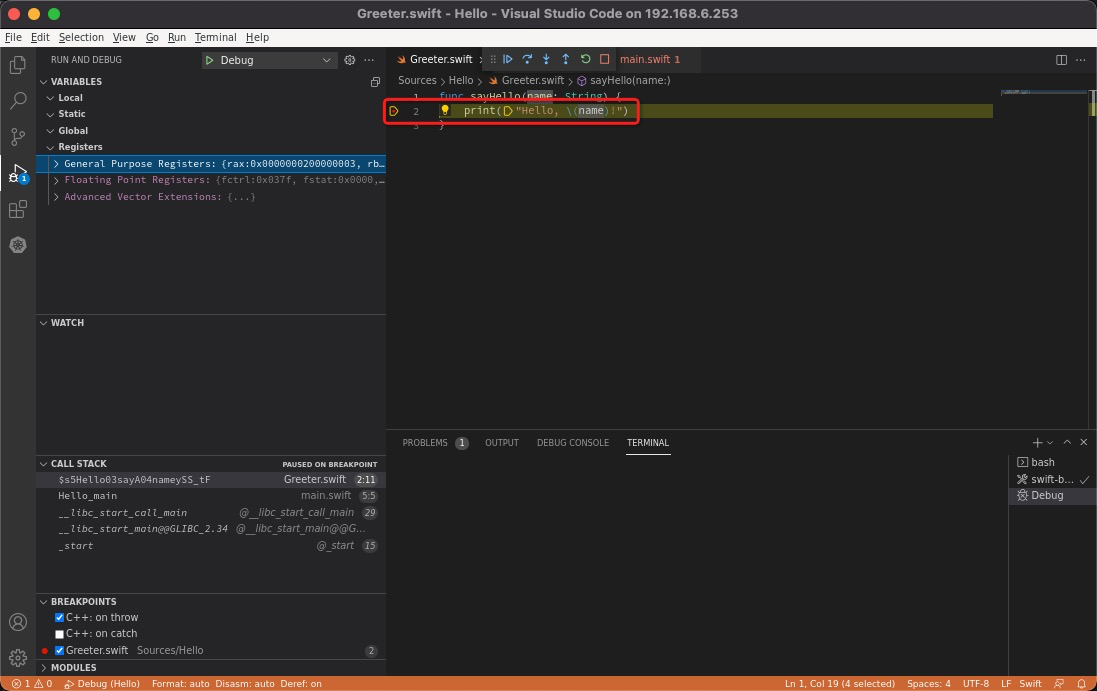
在 Greter.swift 文件中,鼠标移动到第2行边上,当浮现出暗红色圆点时候点击一下这个圆点,则圆点转为鲜红色并固定,这就表示断点 breakpoint :
使用 VS Code内建Debugging ,按下 F5 启动debuging运行,此时可以和之前使用 lldb 命令行相同效果,停留在 Greeter.swift 的第2行
详细 debuging 方法参考 VS Code内建Debugging