创建KVM虚拟机
KVM虚拟化是实现模拟数据中心的核心。因为单纯的Docker+Kubernetes无法模拟多台物理服务器,虽然容器技术更为轻量级。
常规的虚拟机采用 qcow2 镜像文件作为虚拟磁盘,性能有限。为了能够提高虚拟机性能,我们需要采用 Open Virtual Machine Firmware(OMVF) 来实现PCIe pass-through,可以加速网络、存储、图形性能,接近物理主机的性能:
虚拟机的操作系统盘采用LVM卷,减少Host物理主机文件系统的性能消耗: 下文中采用 libvirt LVM卷管理存储池 先创建LVM卷,然后在
virt-install安装命令中指定LVM卷作为虚拟磁盘私有云KVM环境 使用 HPE ProLiant DL360 Gen9服务器 ,内核配置
GRUB_CMDLINE_LINUX_DEFAULT="intel_iommu=on vfio-pci.ids=144d:a80a"详见 私有云KVM环境
创建Ubuntu虚拟机
X86环境Ubuntu虚拟机
创建虚拟机安装Guest操作系统:
virt-install \
  --network bridge:virbr0 \
  --name ubuntu18.04 \
  --ram=2048 \
  --vcpus=1 \
  --os-type=ubuntu18.04 \
  --disk path=/var/lib/libvirt/images/ubuntu18.04.qcow2,format=qcow2,bus=virtio,cache=none,size=16 \
  --graphics none \
  --location=http://mirrors.163.com/ubuntu/dists/bionic/main/installer-amd64/ \
  --extra-args="console=tty0 console=ttyS0,115200"
备注
使用
osinfo-query os可以查询出--os-variant所有支持的参数,这样可以精确指定操作系统版本以便优化运行参数。--graphics none表示不使用VNC来访问VM的控制台,而是使用VM串口的字符控制台。`--location指定通过网络安装,如果使用本地iso安装,则使用--cdrom /var/lib/libvirt/images/ubuntu-18.04.2-live-server-amd64.iso只有通过网络安装才可以使用
--extra-args="console=tty0 console=ttyS0,115200"以便能够通过串口控制台安装。也就是说,如果使用 iso镜像安装,则不能传递内核参数,否则提示报错:ERROR Kernel arguments are only supported with location or kernel installs.
要模拟UEFI,需要安装
ovmf软件包,并使用参数--boot uefiroot分区采用EXT4文件系统,占据整个磁盘
软件包只选择
OpenSSH server以便保持最小化安装,后续clone出的镜像再按需安装
上述安装是通过 virsh console 连接到虚拟机的串口控制台实现的,安装完成后,需要 detach 断开串口控制台: CTRL+Shift+] ,这就可以返回host主机的控制台。
备注
在KVM中部署和运行Windows虚拟机相对复杂,请参考 部署Windows KVM虚拟机
libvirt LVM卷管理存储池 安装Ubuntu 20.04.3:
virsh vol-create-as images_lvm ubuntu20.04 6G

virt-install \
  --network bridge:virbr0 \
  --name ubuntu20.04 \
  --ram=2048 \
  --vcpus=1 \
  --boot uefi --cpu host-passthrough \
  --os-type=ubuntu20.04 \
  --disk path=/dev/vg-libvirt/ubuntu20.04,sparse=false,format=raw,bus=virtio,cache=none,io=native \
  --graphics none \
  --location=http://mirrors.163.com/ubuntu/dists/focal/main/installer-amd64/ \
  --extra-args="console=tty0 console=ttyS0,115200"
备注
安装中磁盘划分:
Virtual disk 1 (vda) - 6.4 GB Virtio Block Device
>     #1  primary  254.8 MB     f  ext4     /boot
>     #2  primary    6.2 GB  B  f  btrfs    /
ARM环境Ubuntu虚拟机
我在 ARM环境KVM快速起步 中使用以下命令安装Ubuntu 20.04.2 LTS虚拟机:
virt-install \
  --network bridge:virbr0 \
  --name ubuntu20.04 \
  --ram=2048 \
  --vcpus=2 \
  --os-type=ubuntu20.04 \
  --disk path=/var/lib/libvirt/images/ubuntu20.04.qcow2,format=qcow2,bus=virtio,cache=none,size=16 \
  --graphics none \
  --cdrom=/var/lib/libvirt/images/ubuntu-20.04.2-live-server-arm64.iso
备注
使用iso镜像安装时,不能传递内核参数 --extra-args="console=tty0 console=ttyS0,115200 ,不过,只要关闭图形输出 --graphics none 似乎就能够从串口输出,不传递参数也能成功(可能是新版本已经支持)。
安装提示:
As the installer is running on a serial console, it has started in basic
mode, using only the ASCII character set and black and white colours.

If you are connecting from a terminal emulator such as gnome-terminal that
supports unicode and rich colours you can switch to "rich mode" which uses
unicode, colours and supports many languages.

You can also connect to the installer over the network via SSH, which will
allow use of rich mode.
选择 rich mode 以后,提供了交互模式配置网络,可以选择默认DHCP获得IP地址,后续再切换成 libvirt 网桥型网络
默认磁盘是LVM划分卷管理
安装过程请选择安装SSH Server,其他软件包不需要安装,等服务器运行起来之后,可以按需安装。
创建CentOS虚拟机
CentOS 8虚拟机安装:
virt-install \
  --network bridge:virbr0 \
  --name centos8 \
  --ram=4096 \
  --vcpus=2 \
  --os-variant=rhel8.0 \
  --disk path=/var/lib/libvirt/images/centos8.qcow2,format=qcow2,bus=virtio,cache=none,size=8 \
  --graphics spice \
  --cdrom=/var/lib/libvirt/images/CentOS-8-x86_64-1905-boot.iso
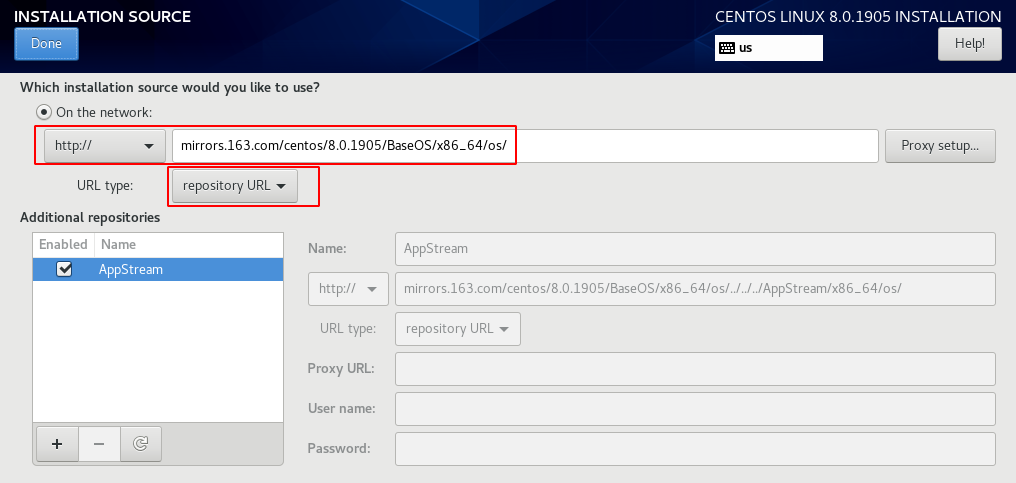
安装过程的
installation source设置为http://mirrors.163.com/centos/8.0.1905/BaseOS/x86_64/os/(URL type是repository URL) 然后点击Done则自动刷新验证,最后显示的安装源如下:
CentOS 8虚拟机在线安装:
virt-install \
  --network bridge:virbr0 \
  --name centos8 \
  --ram=2048 \
  --vcpus=1 \
  --os-type=centos8 \
  --disk path=/var/lib/libvirt/images/centos8.qcow2,format=qcow2,bus=virtio,cache=none,size=6 \
  --graphics none \
  --location=http://mirrors.163.com/centos/8/BaseOS/x86_64/os/ \
  --extra-args="console=tty0 console=ttyS0,115200"
CentOS 7虚拟机在线安装:
virt-install \
  --network bridge:virbr0 \
  --name centos7 \
  --ram=2048 \
  --vcpus=1 \
  --os-type=centos7.0 \
  --disk path=/var/lib/libvirt/images/centos7.qcow2,format=qcow2,bus=virtio,cache=none,size=6 \
  --graphics none \
  --location=http://mirrors.163.com/centos/7/os/x86_64/ \
  --extra-args="console=tty0 console=ttyS0,115200"
CentOS 7虚拟机在线安装( 使用 libvirt ZFS存储池 ,创建方法同下文 创建CentOS 7 (vault)虚拟机 ):
# virsh vol-create-as images_zfs centos7-zfs 20G

virt-install \
  --network bridge:br0 \
  --name centos7-zfs \
  --ram=4096 \
  --vcpus=2 \
  --os-type=Linux --os-variant=rhl7 \
  --boot uefi --cpu host-passthrough \
  --disk vol=images_zfs/centos7-zfs,sparse=false,format=raw,bus=virtio,cache=none,io=native \
  --graphics none \
  --location=http://mirrors.163.com/centos-vault/7.8.2003/os/x86_64/ \
  --extra-args="console=tty0 console=ttyS0,115200"
CentOS 6.10 虚拟机在线安装:
virt-install \
  --network bridge:virbr0 \
  --name centos6 \
  --ram=2048 \
  --vcpus=1 \
  --os-type=centos6.0 \
  --disk path=/var/lib/libvirt/images/centos6.qcow2,format=qcow2,bus=virtio,cache=none,size=6 \
  --graphics none \
  --location=http://mirrors.163.com/centos-vault/6.10/os/x86_64/ \
  --extra-args="console=tty0 console=ttyS0,115200"
备注
使用 libvirt LVM卷管理存储池 创建虚拟机需要先构建LVM卷,详见 libvirt LVM卷管理存储池 实践记录
创建Fedora虚拟机
Fedora 35 Server虚拟机安装:
virt-install \
  --network bridge:virbr0 \
  --name fedora35 \
  --ram=2048 \
  --vcpus=1 \
  --os-type=fedora31 \
  --disk path=/var/lib/libvirt/images/centos35.qcow2,format=qcow2,bus=virtio,cache=none,size=6 \
  --graphics none \
  --location=http://mirrors.163.com/fedora/releases/35/Server/x86_64/os/ \
  --extra-args="console=tty0 console=ttyS0,115200"
Fedora 35 Workstation虚拟机安装(没有在线方式,只能iso安装):
virt-install \
  --network bridge:virbr0 \
  --name fedora35w \
  --ram=2048 \
  --vcpus=1 \
  --os-variant=fedora31 \
  --disk path=/var/lib/libvirt/images/fedora35w.qcow2,format=qcow2,bus=virtio,cache=none,size=6 \
  --graphics spice \
  --cdrom=/var/lib/libvirt/images/Fedora-Workstation-Live-x86_64-34-1.2.iso
使用 libvirt LVM卷管理存储池 则先创建LVM卷再创建虚拟机:
virsh vol-create-as images_lvm fedora35 6G

virt-install \
     --network bridge:virbr0 \
     --name fedora35 \
     --ram=2048 \
     --vcpus=1 \
     --os-type=Linux --os-variant=fedora31 \
     --boot uefi --cpu host-passthrough \
     --disk path=/dev/vg-libvirt/fedora35,sparse=false,format=raw,bus=virtio,cache=none,io=native \
     --graphics none \
     --location=http://mirrors.163.com/fedora/releases/35/Server/x86_64/os/ \
     --extra-args="console=tty0 console=ttyS0,115200"
使用 libvirt ZFS存储池 则先创建ZFS卷再创建虚拟机:
# virsh vol-create-as images_zfs fedora-sway-40 10G

virt-install \
     --network bridge:virbr0 \
     --name fedora-sway-40 \
     --ram=4096 \
     --vcpus=2 \
     --os-variant=fedora40 \
     --boot uefi --cpu host-passthrough \
     --disk vol=images_zfs/fedora-sway-40,sparse=false,format=raw,bus=virtio,cache=none,io=native \
     --graphics spice \
     --cdrom=/var/lib/libvirt/images/Fedora-Xfce-Live-x86_64-40-1.14.iso
     #--cdrom=/var/lib/libvirt/images/Fedora-Sway-Live-x86_64-40-1.14.iso
创建CentOS 7 (vault)虚拟机
备注
存储采用 Libvirt集成Ceph RBD
和 CentOS 8 已死:选择替代的docker镜像 相似,需要采用 centos-vault 163镜像 安装
在 Libvirt集成Ceph RBD 上构建 RBD磁盘:
virsh vol-create-as images_rbd z-centos7-rbd --capacity 20GB --format raw

virt-install \
  --network bridge:br0 \
  --name z-centos7-rbd \
  --ram=4096 \
  --vcpus=2 \
  --os-type=Linux --os-variant=rhl7 \
  --boot uefi --cpu host-passthrough \
  --disk vol=images_rbd/z-centos7-rbd,sparse=false,format=raw,bus=virtio,cache=none,io=native \
  --graphics none \
  --location=http://mirrors.163.com/centos-vault/7.8.2003/os/x86_64/ \
  --extra-args="console=tty0 console=ttyS0,115200"
备注
CentOS 7只推出了 7.8.2003 安装版本,以及升级到 7.9.2009 ,但是不提供直接安装 7.9.2009
所以这里可以看到安装路径是指向 7.8.2003 ,安装以后再在操作系统中升级就会成为 7.9.2009
完成后用于 CentOS 7环境编译GlusterFS 11
创建CentOS 9 Stream虚拟机
备注
存储采用 Libvirt集成Ceph RBD
在 Libvirt集成Ceph RBD 上构建 RBD磁盘:
virsh vol-create-as images_rbd z-centos9 --capacity 6GB --format raw
安装虚拟机:
virt-install \
  --network bridge:virbr0 \
  --name z-centos9 \
  --ram=2048 \
  --vcpus=1 \
  --os-type=Linux --os-variant=rhl9 \
  --boot uefi --cpu host-passthrough \
  --disk vol=images_rbd/z-centos9,sparse=false,format=raw,bus=virtio,cache=none,io=native \
  --graphics none \
  --location=http://mirror.stream.centos.org/9-stream/BaseOS/x86_64/os/ \
  --extra-args="console=tty0 console=ttyS0,115200"
备注
注意,Ceph远程RBD的存储池是 libvirt-pool ,对应本地libvirt的存储池是 images_rbd
参数 io=native 必须同时指定缓存类型,否则会提示:
ERROR unsupported configuration: native I/O needs either no disk cache or directsync cache mode, QEMU will fallback to aio=threads
缓存类型选择参考 KVM Disk Cache Modes
网络安装过程显示下载了初始镜像,但是出现报错:
[  138.710304] dracut-initqueue[931]: Warning: dracut-initqueue: timeout, still waiting for following initqueue hooks:
[  138.721893] dracut-initqueue[931]: Warning: /lib/dracut/hooks/initqueue/finished/devexists-\x2fdev\x2froot.sh: "[ -e "/dev/root" ]"
[  138.725314] dracut-initqueue[931]: Warning: /lib/dracut/hooks/initqueue/finished/wait_for_settle.sh: "[ -f /tmp/settle.done ]"
[  138.729151] dracut-initqueue[931]: Warning: dracut-initqueue: starting timeout scripts
[  138.730615] dracut-initqueue[931]: Warning: ############# Anaconda installer errors begin #############
[  138.732271] dracut-initqueue[931]: Warning: #                                                         #
[  138.733904] dracut-initqueue[931]: Warning: It seems that the boot has failed. Possible causes include
[  138.735488] dracut-initqueue[931]: Warning: missing inst.stage2 or inst.repo boot parameters on the
[  138.737029] dracut-initqueue[931]: Warning: kernel cmdline. Please verify that you have specified
[  138.738613] dracut-initqueue[931]: Warning: inst.stage2 or inst.repo.
[  138.739813] dracut-initqueue[931]: Warning: Please also note that the 'inst.' prefix is now mandatory.
[  138.741374] dracut-initqueue[931]: Warning: #                                                         #
[  138.743049] dracut-initqueue[931]: Warning: ####     Installer errors encountered during boot:     ####
[  138.744683] dracut-initqueue[931]: Warning: #                                                         #
[  138.746345] dracut-initqueue[931]: /lib/dracut/hooks/initqueue/timeout/50-anaconda-error-reporting.sh: line 19: /run/anaconda/initrd_errors.txt: No such file or directory
[  138.748737] dracut-initqueue[931]: Warning: #                                                         #
[  138.750316] dracut-initqueue[931]: Warning: ############# Anaconda installer errors end ###############
调整安装模式,改为ISO安装:
cd /var/lib/libvirt/images
axel -n 20 http://mirror.stream.centos.org/9-stream/BaseOS/x86_64/iso/CentOS-Stream-9-latest-x86_64-dvd1.iso

virt-install \
  --network bridge:br0 \
  --name z-centos9 \
  --ram=2048 \
  --vcpus=1 \
  --os-type=Linux --os-variant=rhl9 \
  --boot uefi --cpu host-passthrough \
  --disk vol=images_rbd/z-centos9,sparse=false,format=raw,bus=virtio,cache=none,io=native \
  --cdrom=/var/lib/libvirt/images/CentOS-Stream-9-latest-x86_64-boot.iso
备注
我目前遇到VNC无法打开问题,待手续补充实践记录
创建SUSE虚拟机
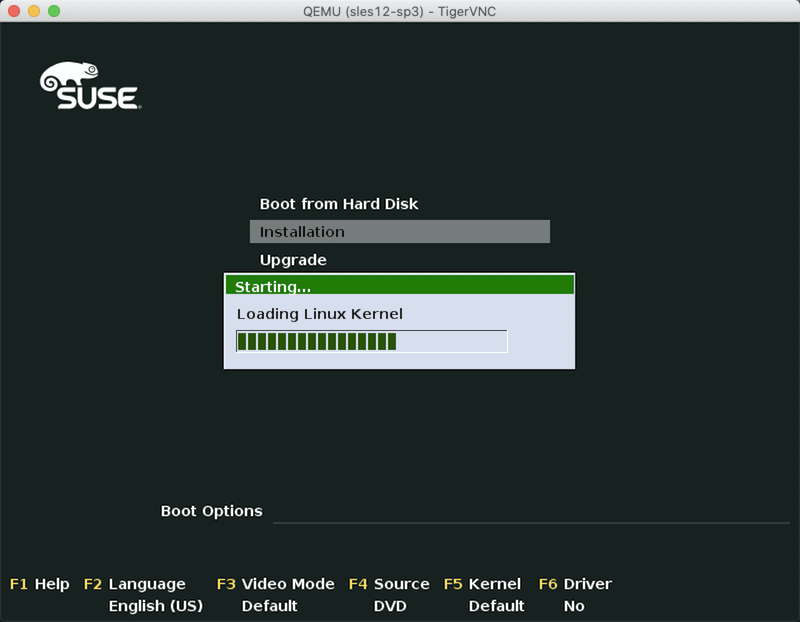
部署suse server 12 sp3:
virt-install \
  --network bridge:virbr0 \
  --name sles12-sp3 \
  --ram=2048 \
  --vcpus=1 \
  --os-type=sles12sp3 \
  --disk path=/var/lib/libvirt/images/sles12-sp3.qcow2,format=qcow2,bus=virtio,cache=none,size=16 \
  --graphics vnc \
  --cdrom=/var/lib/libvirt/images/SLE-12-SP3-Server-DVD-x86_64-GM-DVD1.iso
这里输出有一个警告提示:
WARNING  Graphics requested but DISPLAY is not set. Not running virt-viewer.
WARNING  No console to launch for the guest, defaulting to --wait -1

Starting install...
Allocating 'sles12-sp3.qcow2'                             |  16 GB  00:00

Domain is still running. Installation may be in progress.
Waiting for the installation to complete.
备注
参数 --graphics vnc 会在服务器本地回环地址 127.0.0.1 上启动VNC监听,可以通过 virsh vncdisplay <vm_name> 查看:
virsh vncdispaly sles12-sp3
例如输出:
127.0.0.1:0
则可以使用ssh端口转发登陆服务器:
ssh -L 5900:127.0.0.1:5900 <username>@<server_ip>
也可以配置 ~/.ssh/config 中添加配置:
Host server_name
    HostName server_ip
    User huatai
    LocalForward 5900 127.0.0.1:5900
然后执行:
ssh -C server_name
就可以实现同样的ssh端口转发。
备注
KVM提供的VNC访问方式在macOS上需要使用第三方VNC客户端来访问,例如 TigerVNC 或者 Remote Ripple (从苹果应用商店安装,推荐) ,使用macOS内置的vnc无法打开访问。使用VNC客户端访问本地 127.0.0.1:5900 则可以看到远程虚拟机的终端界面,就可以开始进一步安装:
另外,需要注意苹果的 macOS 提供了内置的VNC Server,也就是 Screen Sharing 功能(从 System Settings >> General >> Sharing 进入菜单),这个 Screen Sharing 功能占用 5900 端口,所以在苹果macOS上使用上上述ssh端口转发登陆服务器,需要避免端口冲突
创建LFS虚拟机
使用 libvirt ZFS存储池 则先创建ZFS卷再创建虚拟机:
# virsh vol-create-as images_zfs fedora-sway-40 10G

virt-install \
     --network bridge:virbr0 \
     --name fedora-sway-40 \
     --ram=4096 \
     --vcpus=2 \
     --os-variant=fedora40 \
     --boot uefi --cpu host-passthrough \
     --disk vol=images_zfs/fedora-sway-40,sparse=false,format=raw,bus=virtio,cache=none,io=native \
     --graphics spice \
     --cdrom=/var/lib/libvirt/images/Fedora-Xfce-Live-x86_64-40-1.14.iso
     #--cdrom=/var/lib/libvirt/images/Fedora-Sway-Live-x86_64-40-1.14.iso
注意 --os-type 参数已经废弃,现在需要使用 --os-variant/--osinfo 传递操作系统名字,这里因为使用LFS不属于常见的Linux发行版,选择了通用的 --os-variant=linux2022 (使用 osinfo-query os 获取支持列表名)
这里使用了 --graphics spice 参数指定图形界面,需要使用 virt-viewer虚拟机图形管理接口工具 来访问,所以 Gentoo 虚拟化 需要安装 virt-viewer 软件包
虚拟机bridge网络
上述创建虚拟机都采用了 --network bridge:virbr0 参数,这个参数是 libvirt NAT型网络 ,设置简单,但是不方便对外提供服务,并且性能不如 libvirt 网桥型网络 。为了方便模拟生产环境,我在服务器内部管理网段 192.168.6.x 采用bridge网络,并且采用 Systemd Networkd服务 创建网桥 br0 。
创建网桥br0
需要配置3个 /etc/systemd/network 目录下网桥和bind配置:
mybridge.netdev:
1[NetDev]
2Name=br0
3Kind=bridge
bind.network:
1[Match]
2Name=enp0s25
3
4[Network]
5Bridge=br0
mybridge.network:
1[Match]
2Name=br0
3
4[Network]
5Address=192.168.6.200/24
然后重启一次
systemd-netowrkdsystemctl restart systemd-networkd.service
检查
brctl show显示如下:bridge name bridge id STP enabled interfaces br0 8000.7e33f1ea9ee3 no enp0s25
修订libvirt配置绑定br0
执行
virsh edit sles12-sp3修订虚拟机配置:<interface type='bridge'> <mac address='52:54:00:00:91:62'/> <source bridge='virbr0'/> <model type='virtio'/> <address type='pci' domain='0x0000' bus='0x01' slot='0x00' function='0x0'/> </interface>
修改成:
<interface type='bridge'>
  <mac address='52:54:00:00:91:62'/>
  <source bridge='br0'/>
  <model type='virtio'/>
  <address type='pci' domain='0x0000' bus='0x01' slot='0x00' function='0x0'/>
</interface>
也就是只需要修改 <source bridge='xxx'> 就可以修改绑定的网桥
重启虚拟机:
virsh shutdown sles12-sp3
virsh start sles12-sp3
通过VNC登陆,修订网络配置
虚拟机串口设置
设置虚拟机串口输出
通过ssh登陆到刚才创建的虚拟机,然后执行:
systemctl enable serial-getty@ttyS0.service
systemctl start serial-getty@ttyS0.service
备注
默认安装的虚拟机并没有提供串口输出,也就是无法通过 virsh console ubuntu18.04 来访问虚拟机控制台。这样唯一登陆虚拟机的方法是依赖上述最小化安装时候附加安装的 OpenSSH server 通过网络登陆。注意,此时虚拟机的IP地址是通过 libvirt 的DHCP分配的,所以无法直接知道IP地址。
可以通过 sudo ping -b 192.168.122.255 此时在 virbr0 虚拟网络中广播地址,就可以再通过 arp -a | grep virbr0 找到运行中虚拟机的IP地址:
? (192.168.122.186) at 52:54:00:8a:45:89 [ether] on virbr0
此时就可以 ssh 192.168.122.186 登陆到虚拟机内部,再调整虚拟机内核配置输出串口。
备注
Host主机 /var/lib/libvirt/dnsmasq/virbr0.status 提供了当前dnsmasq分配的IP地址情况。所以上述通过arp解析方法只适合在少数虚拟机时候使用,直接检查这个状态文件可以看到类似:
[
  {
    "ip-address": "192.168.122.186",
    "mac-address": "52:54:00:8a:45:89",
    "hostname": "ubuntu18-04",
    "client-id": "ff:32:39:f9:b5:00:02:00:00:ab:11:1a:49:39:51:4b:f1:45:b4",
    "expiry-time": 1551337558
  }
]
备注
详细的KVM虚拟机串口设置请参考 虚拟机串口控制台
虚拟机内部初始设置
修改Guest系统的
/etc/sudoers允许sudo用户组可以无密码执行:#%sudo ALL=(ALL:ALL) ALL %sudo ALL=(ALL:ALL) NOPASSWD:ALL
参考 激活netplan 设置好Guest虚拟机的静态IP地址,便于后续clone出虚拟机后调整
在用户目录
~/.ssh/authorized_keys中添加Host物理主机的公钥,以便能够方便登陆管理对齐物理主机、工作主机和虚拟机中同名账号的uid和gid
备注
CentOS/RHEL 默认新开设的第一个账号的 uid/gid 是 501/20 ,为方便各个虚拟机之间免密同账号登陆,将所有平台的自己个人账号的 uid/gid 对齐,以便避免权限错乱。
安装后登陆Guest系统内部更新系统并安装必要软件:
sudo apt update
sudo apt upgrade
sudo apt install screen net-tools nmon
准备虚拟机的动态调整
配置模版虚拟机的
setmaxmem和手工修改配置,以便后续能够根据需要动态修改虚拟机的vcpu和mem:virsh setmaxmem ubuntu18.04 16G
不过,设置最大vcpu数量方法没有直接的virsh命令,所以采用 virsh edit ubuntu18.04 方法,将以下配置:
<vcpu placement='static'>1</vcpu>
修改成:
<vcpu placement='static' current='1'>8</vcpu>
备注
详细的动态修改虚拟机vcpu和memory的方法参考 动态调整KVM虚拟机内存和vcpu实战
下一步
现在我们已经创建了第一个可用的KVM虚拟机,并且对虚拟机做了调整。现在用这个虚拟机作为模版,我们可以快速clone出实验所需的虚拟机: