Istio起步
下载
从 Istio releases页面 可以找到对应操作系统和架构的安装包文件,也可以直接通过以下命令下载:
curl -L https://istio.io/downloadIstio | sh -
如果要指定版本和架构,例如 ARM ,则使用如下下载案例:
curl -L https://istio.io/downloadIstio | ISTIO_VERSION=1.18.2 TARGET_ARCH=arm64 sh -
按照安装脚本提示执行:
# 按照安装脚本提示
# 添加环境变量
export PATH="$PATH:/root/istio-1.18.2/bin"

# 预检查
istioctl x precheck
如果顺利,则提示信息:
✔ No issues found when checking the cluster. Istio is safe to install or upgrade!
  To get started, check out https://istio.io/latest/docs/setup/getting-started/
安装
Istio提供了多个 Istio configuration profile ,对于生产环境建议使用 default ,对于测试环境,建议使用 demo (两者的差异是 demo 增加了安装 istio-egressgateway 组件,并且安装了 Istio Bookinfo案例应用 方便学习研究)
istioctl install 安装 profile=demoistioctl install --set profile=demo -y
添加一个namespace label让istio自动注入Envoy sidecar proxy:
istio-injection=enabled 方便后续部署应用自动注入Envoy sidecarkubectl label namespace default istio-injection=enabled
部署案例应用
部署 Istio Bookinfo案例应用 :
kubectl apply -f samples/bookinfo/platform/kube/bookinfo.yaml
输出显示:
service/details created
serviceaccount/bookinfo-details created
deployment.apps/details-v1 created
service/ratings created
serviceaccount/bookinfo-ratings created
deployment.apps/ratings-v1 created
service/reviews created
serviceaccount/bookinfo-reviews created
deployment.apps/reviews-v1 created
deployment.apps/reviews-v2 created
deployment.apps/reviews-v3 created
service/productpage created
serviceaccount/bookinfo-productpage created
deployment.apps/productpage-v1 created
检查服务和pods,可以看到 services 启动(注意没有
EXTERNAL-IP是因为缺乏 Kubernetes MetalLB 负载均衡 部署)
kubectl get services
NAME          TYPE        CLUSTER-IP      EXTERNAL-IP   PORT(S)    AGE
details       ClusterIP   10.233.60.17    <none>        9080/TCP   2m39s
kubernetes    ClusterIP   10.233.0.1      <none>        443/TCP    57d
productpage   ClusterIP   10.233.28.23    <none>        9080/TCP   2m38s
ratings       ClusterIP   10.233.46.200   <none>        9080/TCP   2m39s
reviews       ClusterIP   10.233.35.53    <none>        9080/TCP   2m38s
kubectl get pods
NAME                              READY   STATUS      RESTARTS   AGE
details-v1-6997d94bb9-vx6x6       2/2     Running     0          4m33s
productpage-v1-58b4c9bff8-478vf   2/2     Running     0          4m31s
ratings-v1-b8f8fcf49-xkpb4        2/2     Running     0          4m32s
reviews-v1-5896f547f5-qmsnb       2/2     Running     0          4m32s
reviews-v2-5d99885bc9-gbbhm       2/2     Running     0          4m32s
reviews-v3-589cb4d56c-tcftw       2/2     Running     0          4m32s
执行以下命令可以检查应用是否正确运行(实际上就是通过在容器内部检查curl页面):
kubectl exec "$(kubectl get pod -l app=ratings -o jsonpath='{.items[0].metadata.name}')" -c ratings -- curl -sS productpage:9080/productpage | grep -o "<title>.*</title>"
输出显示:
<title>Simple Bookstore App</title>
设置应用对外流量: 创建 Istio流量管理 Ingress Gateway:
这里我们简单解析一下案例 samples/bookinfo/networking/bookinfo-gateway.yaml :
bookinfo-gateway.yamlapiVersion: networking.istio.io/v1alpha3
kind: Gateway
metadata:
name: bookinfo-gateway
spec:
# The selector matches the ingress gateway pod labels.
# If you installed Istio using Helm following the standard documentation, this would be "istio=ingress"
selector:
istio: ingressgateway # use istio default controller
servers:
- port:
number: 80
name: http
protocol: HTTP
hosts:
- "*"
---
apiVersion: networking.istio.io/v1alpha3
kind: VirtualService
metadata:
name: bookinfo
spec:
hosts:
- "*"
gateways:
- bookinfo-gateway
http:
- match:
- uri:
exact: /productpage
- uri:
prefix: /static
- uri:
exact: /login
- uri:
exact: /logout
- uri:
prefix: /api/v1/products
route:
- destination:
host: productpage
port:
number: 9080
可以看到这是一个类似 Nginx反向代理 的配置( VirtualService )
创建Istio gateway:
kubectl apply -f samples/bookinfo/networking/bookinfo-gateway.yaml
此时提示输出
gateway.networking.istio.io/bookinfo-gateway created
virtualservice.networking.istio.io/bookinfo created
检测Ingress的IP和端口
执行检查 Ingress 服务:
istio-ingressgateway 的service(svc)kubectl get svc istio-ingressgateway -n istio-system
输出显示:
istio-ingressgateway 的service(svc): 输出显示 EXTERNAL-IP 没有分配NAME TYPE CLUSTER-IP EXTERNAL-IP PORT(S) AGE
istio-ingressgateway LoadBalancer 10.233.8.166 <pending> 15021:31210/TCP,80:31659/TCP,443:30721/TCP,31400:32337/TCP,15443:30050/TCP 6h28m
可以看到 EXTERNAL-IP 始终是 pending 状态,表示没有分配外部访问IP地址
这个 EXTERNAL-IP 是云计算厂商提供的负载均衡,因为 Kubernetes 设计架构就是部署在云计算厂商的环境,直接调用云厂商的负载均衡(LoadBalancer)的API接口来获得负载均衡外部访问IP地址。
对于个人部署的 Barmetal 裸金属服务器,需要部署 Kubernetes MetalLB 负载均衡 来实现云厂商提供的外部负载均衡功能: 在 istio 上部署Metallb
安装和配置 Kubernetes MetalLB 负载均衡
按照 安装MetalLB 步骤完成
MetalLB安装(这里步骤不再复述)创建
MetalLB的IP资源池来对外提供服务:
y-k8s-ip-pool.yaml 设置对外提供负载均衡服务的IP地址池apiVersion: metallb.io/v1beta1
kind: IPAddressPool
metadata:
name: y-k8s-ip-pool
namespace: metallb-system
spec:
addresses:
- 192.168.8.151-192.168.8.198
然后执行创建:
y-k8s-ip-pool 的MetalLB地址池kubectl create -f y-k8s-ip-pool.yaml
一旦完成
MetalLB的负载均衡服务的IP地址池,再次检查 Ingress 服务:
istio-ingressgateway 的service(svc)kubectl get svc istio-ingressgateway -n istio-system
Binggo ,现在可以看到对外服务的IP地址已经分配:
MetalLB 地址池配置后, istio-ingressgateway 的service(svc) 正确获得了对外服务负载均衡IPNAME TYPE CLUSTER-IP EXTERNAL-IP PORT(S) AGE
istio-ingressgateway LoadBalancer 10.233.8.166 192.168.8.151 15021:31210/TCP,80:31659/TCP,443:30721/TCP,31400:32337/TCP,15443:30050/TCP 24h
获得访问URL
执行以下命令获得访问URL:
# 对于其他云环境,参考原文 https://istio.io/latest/docs/setup/getting-started/#determining-the-ingress-ip-and-ports

# Ingress host:
export INGRESS_HOST=$(kubectl -n istio-system get service istio-ingressgateway -o jsonpath='{.status.loadBalancer.ingress[0].ip}')
# Ingress port:
export INGRESS_PORT=$(kubectl -n istio-system get service istio-ingressgateway -o jsonpath='{.spec.ports[?(@.name=="http2")].port}')
export SECURE_INGRESS_PORT=$(kubectl -n istio-system get service istio-ingressgateway -o jsonpath='{.spec.ports[?(@.name=="https")].port}')

# 获得实际访问GATEWAY URL
export GATEWAY_URL=$INGRESS_HOST:$INGRESS_PORT
echo "$GATEWAY_URL"
按照上文实践,我获得的URL输出如下:
192.168.8.151:80
备注
上述访问URL是我部署 zcloud 的内部网络IP地址池,所以对外 public 网段不能直接访问。有两种简便方式:
方法一: 通过
iptables端口转发:
iptables 端口转发实现访问内网 Kubernetes 的 Kubernetes MetalLB 负载均衡 输出入口# 假设public接口IP地址是 10.10.1.111 (模拟对internet提供服务)
local_host=10.10.1.111
bookinfo_port=80
istio_bookinfo_host=192.168.8.151
istio_bookinfo_port=80
sudo iptables -t nat -D PREROUTING -p tcp --dport ${bookinfo_port} -j DNAT --to-destination ${istio_bookinfo_host}:${istio_bookinfo_port}
sudo iptables -t nat -D POSTROUTING -p tcp -d ${istio_bookinfo_host} --dport ${istio_bookinfo_port} -j SNAT --to-source ${local_host}
方法二: 构建 Nginx反向代理
Dashboard
Istio提供了一个Dashboard来实现可观测性
默认
kiali采用了ClusterIP,所以外部无法访问,官方采用了istioctl dashboard kiali方式在127.0.0.1上开启20001端口访问(但是我是在服务器上部署,所以转换为 LoadBalancer 模式,结合 Kubernetes MetalLB 负载均衡 就非常容易实现访问)修改
kubectl -n istio-system edit svc kialitype: ClusterIP
改为:
type: LoadBalancer
此时 svc 从如下:
kiali ClusterIP 10.233.63.114 <none> 20001/TCP,9090/TCP 15m
自动修改成:
kiali LoadBalancer 10.233.63.114 192.168.8.152 20001:32561/TCP,9090:32408/TCP 20m
再次创建一个简单的端口转发脚本
iptables_port_forwarding_kiali:
iptables 端口转发实现访问 kialilocal_host=10.1.1.111
kiali_port=20001
istio_kiali_host=192.168.8.152
istio_kiali_port=20001
sudo iptables -t nat -A PREROUTING -p tcp -d ${local_host} --dport ${kiali_port} -j DNAT --to-destination ${istio_kiali_host}:${istio_kiali_port}
sudo iptables -t nat -A POSTROUTING -p tcp -d ${istio_kiali_host} --dport ${istio_kiali_port} -j SNAT --to-source ${local_host}
则可以通过访问 http://10.1.1.111:20001/kiali 来访问 kiali 服务
此时就可以看到 kiali Dashboard:
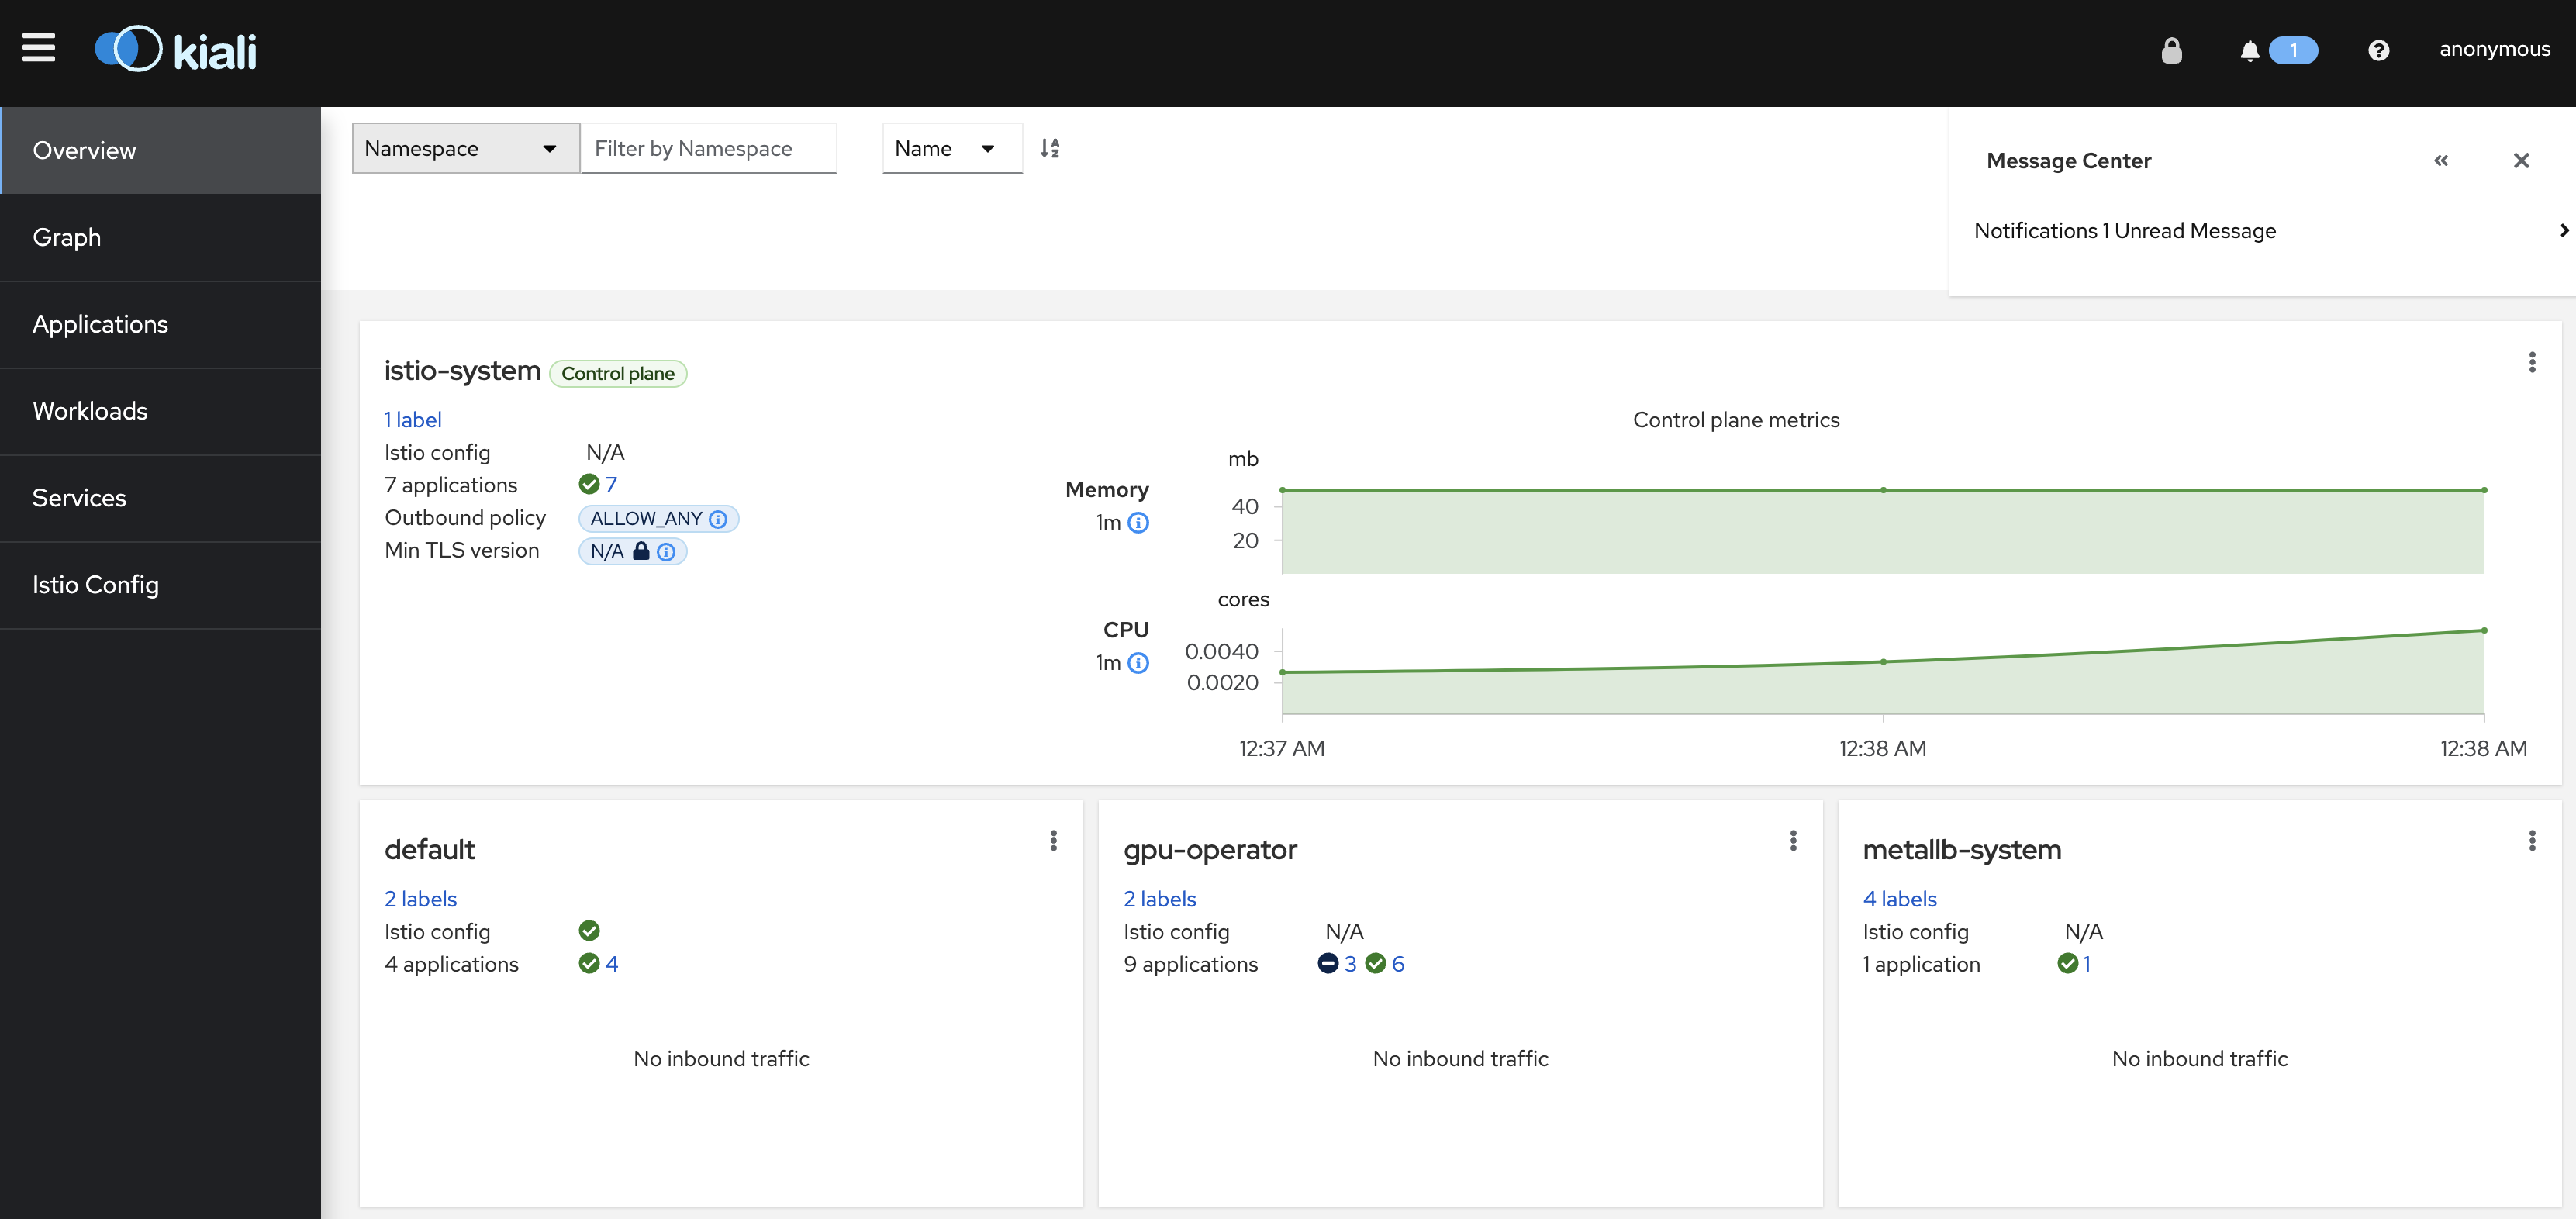
简单使用
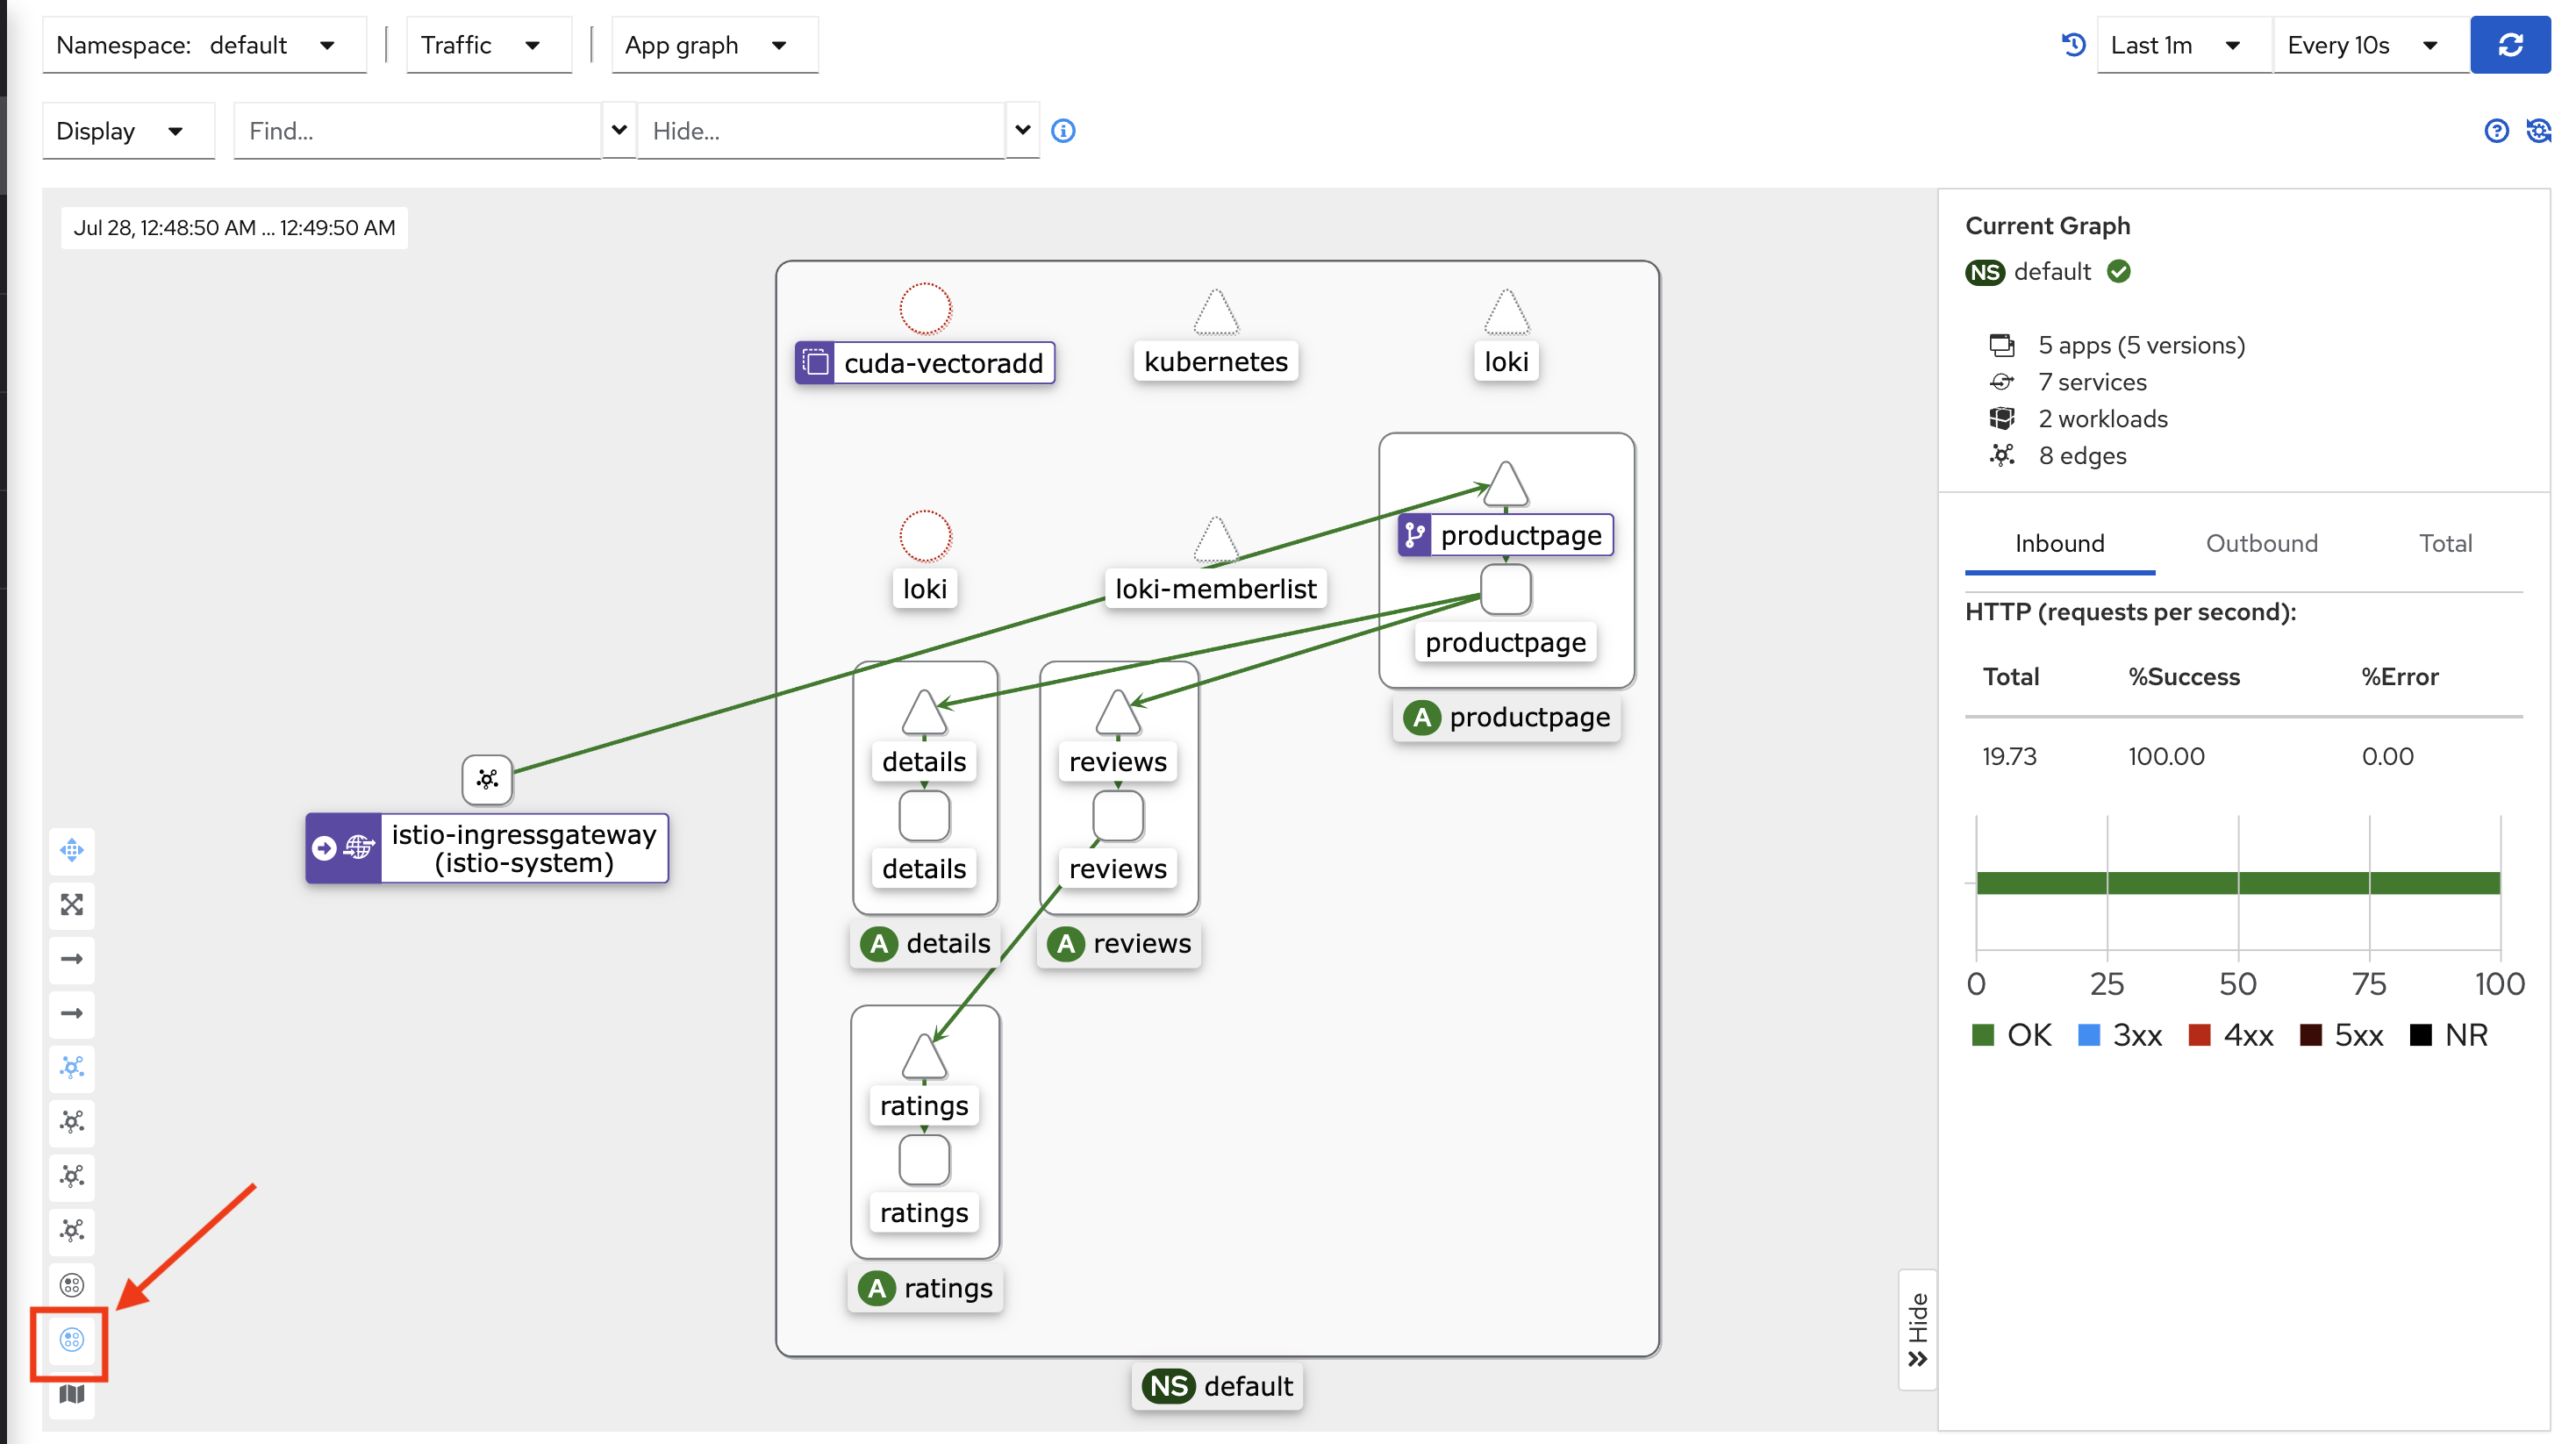
点击
Graph导航图标,然后在终端执行以下压测命令:for i in $(seq 1 10000); do curl -s -o /dev/null "http://$GATEWAY_URL/productpage"; done
此时在
Graph页面就会看到图形化流量演示:

此时点击 Namespace Layout 2 kiali-breathfirst 按钮就会看到监控组件关系(注意需要选择 default namespace)
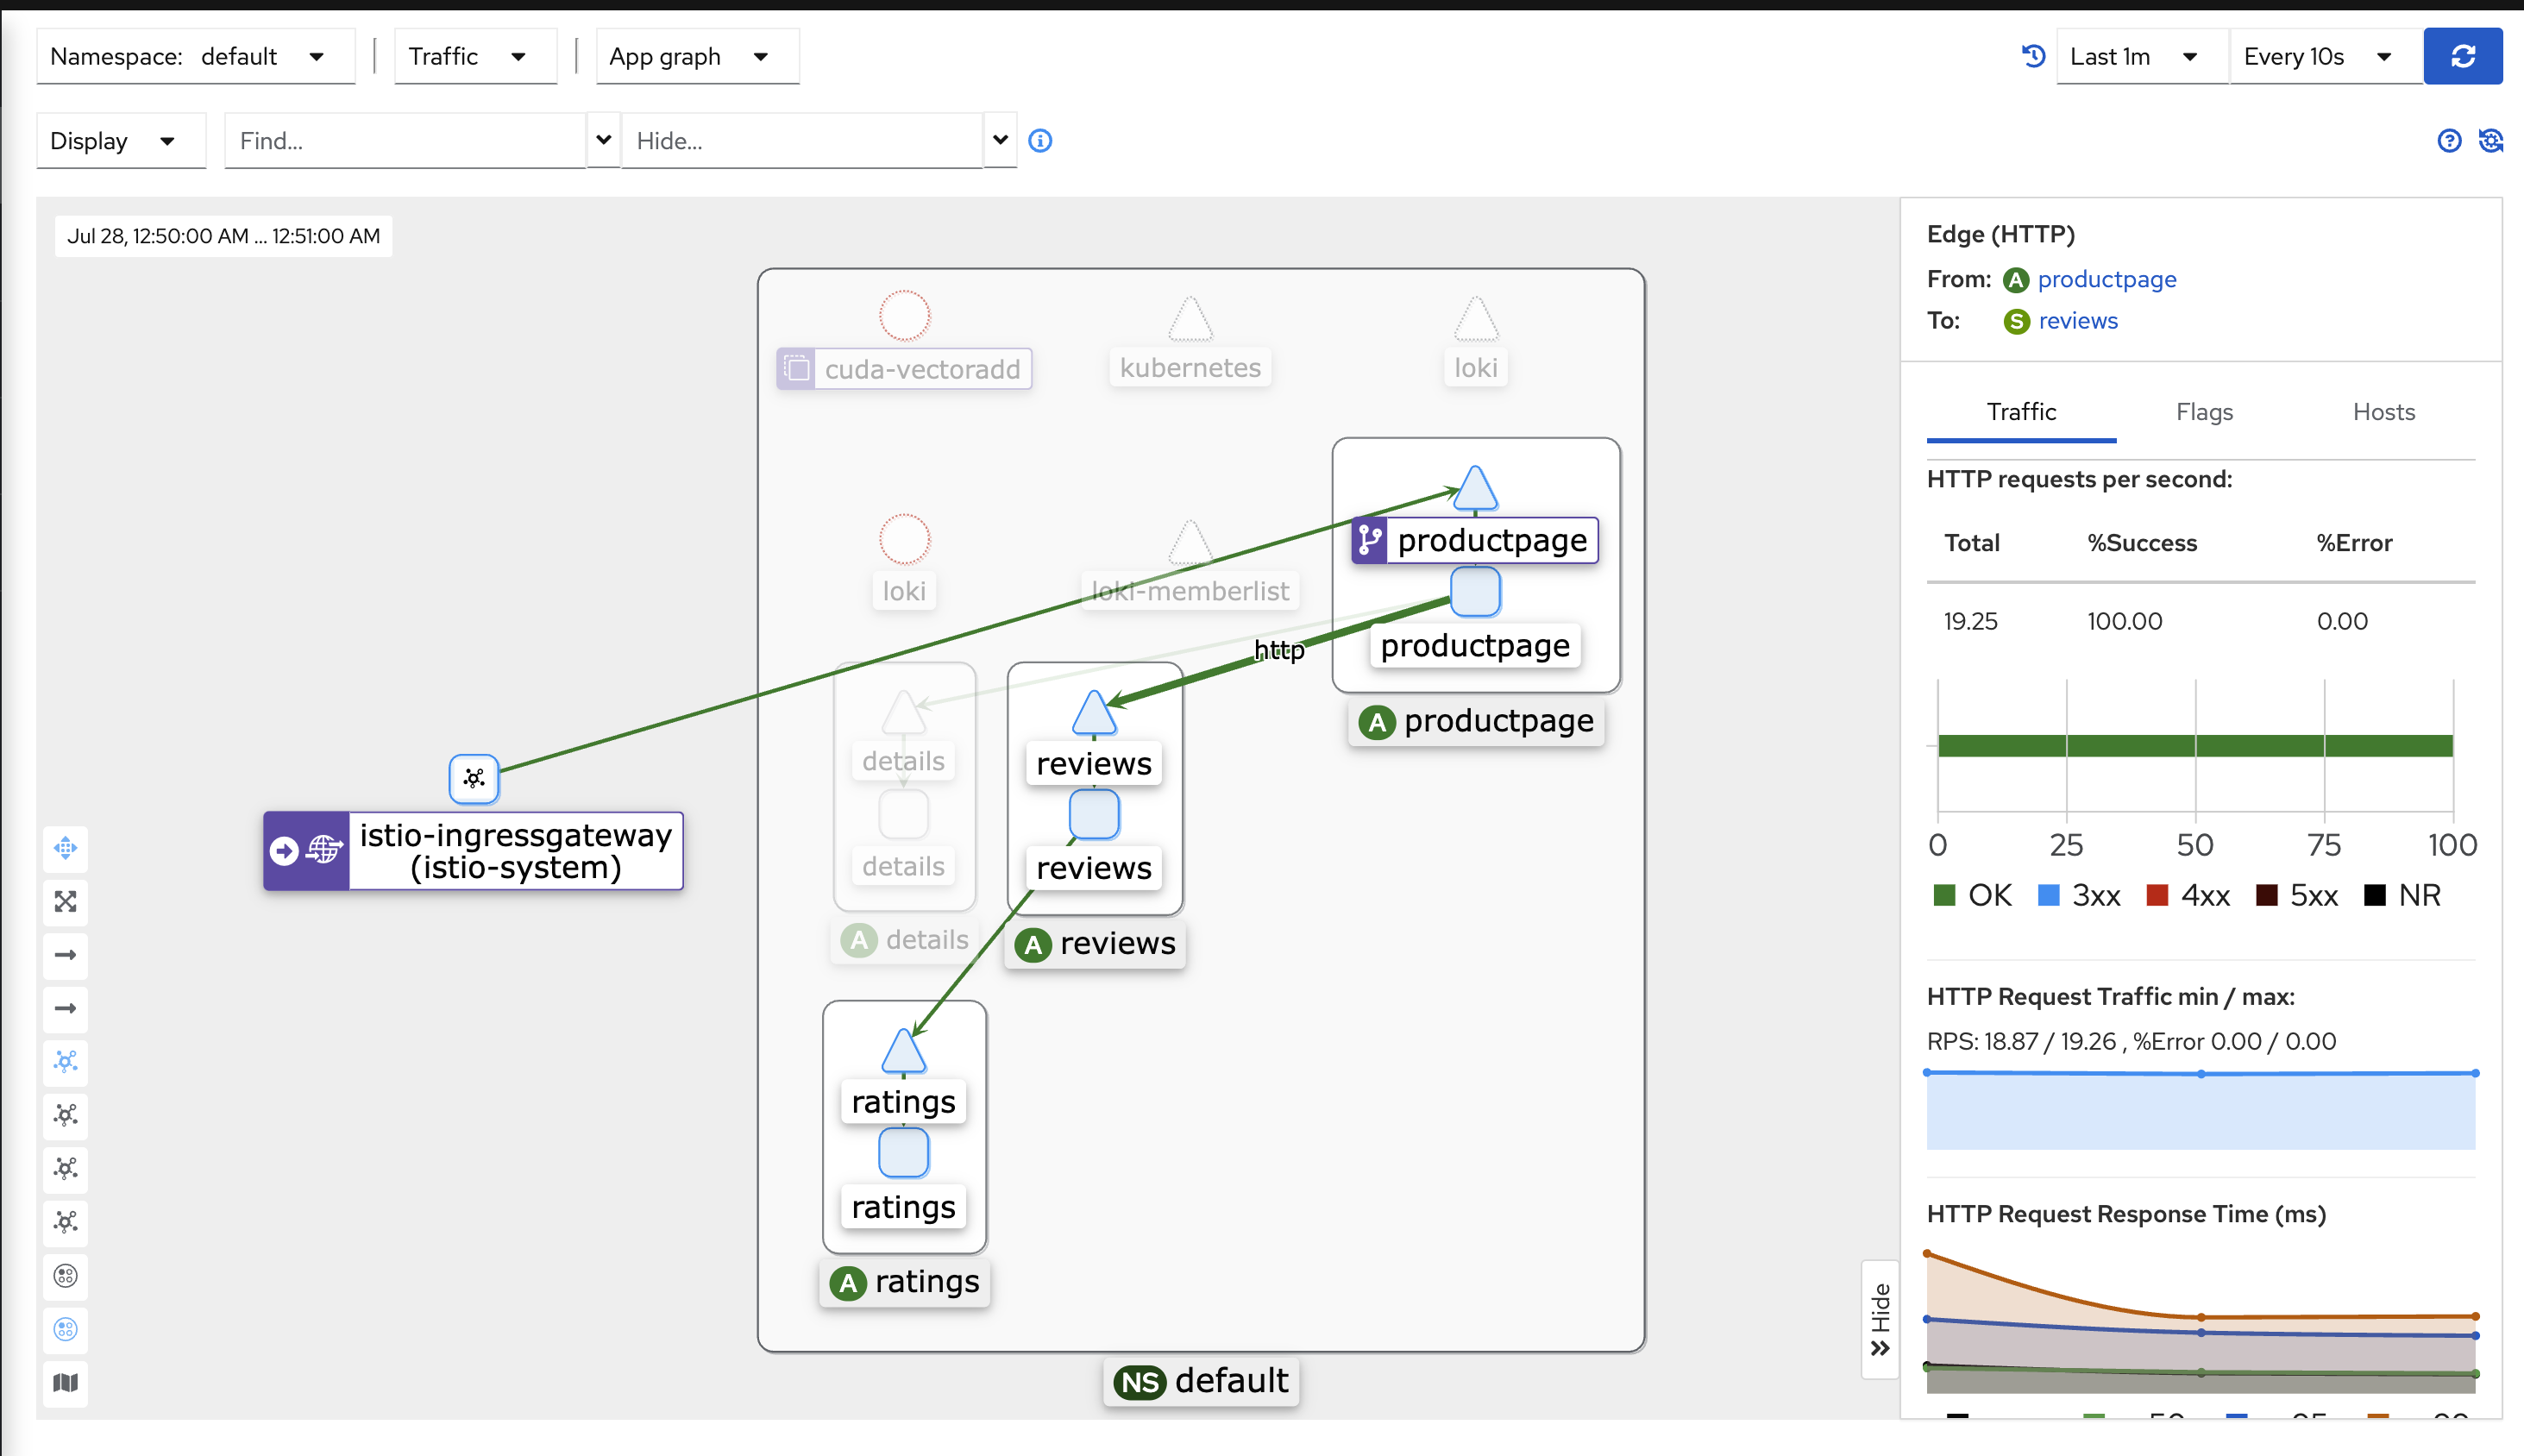
此外点击某个链路还能看到详细流量分析
备注
目前仅仅完成搭建,还有很多需要学习实践